User Tools
download_and_install
Download and Install, Step by Step Directions
- You'll need a merchant account from one of our credit card processing partners:
- BluePay Processing.
- Call Dylan (no, not Bob Dylan!) at BluePay and ask him to set you up with a “Sandbox Account,” for testing with GoldPay. Tell him Steven sent you. Dylan's number is (630)300-2363. His turnaround on such requests is usually less than an hour. In a pinch, we, at Plain English can also create one of these for you.
- Dylan will try to give you a quote, showing you how much money you can save by switching to BluePay. Let him give you a quote. Don't worry, he's harmless. If you go with GoldPay we'll be switching you to one of our partner processors, possibly BluePay.
- Avid Payment Solutions.
- Call Clint (no, not Clint Eastwood) at Avid. Clint's number is (248)723-5760, ext. 101. Tell Clint you need a FirstData practice account, with a Merchant ID, Gateway ID, and Password. We've worked with Clint and his team at Avid nearly 20 years… he'll set you up!
- Clint, also, will virtually guarantee he'll be saving you money over what you're paying now. Let him give you a quote. It couldn't hurt, right?
- Download the GoldPay software from http://www.plain-english.com/downloads/goldpay to a convenient spot on your computer.
- Run GoldMine, and leave it open for now.
- Run the GoldPay installation program, or just copy the files from goldpay.zip to a central location like k:\apps\goldpay.
- Run goldpay.exe. Goldpay will (should!) recognize that you haven't run the configuration program yet (goldpayconfig.exe), and will offer to run it for you. Click Yes.
- The choices required for configuration are intuitive and simple. You'll need your Merchant ID and Secret Key, both of which are available on the account configuration page at BluePay.com, after you've logged in to your Sandbox account:
Admin → Accounts → List → click your acct.
Note: your “Account ID” is also called your “Merchant ID.” - Your best bet, by far, is to use copy and paste, especially with the Secret Key, as it is quite long. We store your secret key in the goldpay.ini file in encrypted form. Encryption is what we use… to keep your key secret!
- GoldMine configuration. You'll want to make it easy for your users to run GoldPay so you'll create a Taskbar button for them in GoldMine. An example of that is shown here: "Creating a Shortcut"
- When saving a credit card, the information about that card (but not the card number!) gets written to a “Detail” record in GoldMine. In the following steps we'll create for you a “Credit Card” detail record type. To prepare the Detail record type:
- Go to the Details tab.
- Right-click, choose New.
- Click in the Detail field, then click the right-arrow. (Note: if you see Credit Card is already on the list, select it, then jump to step f.)
- Click New to create a new Detail type.
- Type “Credit Card” without the quotes.
- Click OK. Click Select.
- Click the Setup tab.
- Fill in the fields as shown here:
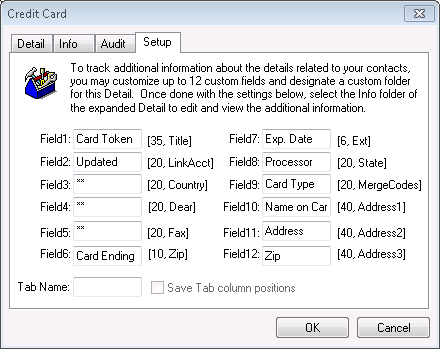
- Click OK. Click Yes.
- Double-click the Credit Card Detail record you just created, and check the Setup tab to be sure you got all the fields created in the right place, i.e. matching the layout above. The characters in Fields 3, 4, and 5 are double-asterisks, which suppress the display of these (unused) fields.
The result of your handywork may be seen on the Info tab.
download_and_install.txt · Last modified: 2014/08/04 18:28 by steveng
Except where otherwise noted, content on this wiki is licensed under the following license: CC Attribution-Share Alike 3.0 Unported
