Questions: Check out our FAQ.
Please note: The information here has been superceded by our online User and Admin Guide at:
http://www.plain-english.com/goldsmsdoc

The information that follows should be considered "legacy." Please refer to our current online User Guide instead:
http://www.plain-english.com/goldsmsdoc
Download and install
- Click this link to download GoldSMS. Everything is in a single zip file called goldsms.zip. Download it to a convenient location, like your desktop or your MyDownloads folder. Open it up, and you'll find some flavor of setup.exe, possibly with the "build date" incorporated into the name.
- Run Setup (setup.exe). We recommend that you run Setup "as administrator," using the righ-click option. Also, in some cases, you may need to copy the contents of goldsms.zip into a temporary folder on your local (not network) hard drive prior to running Setup. Otherwise, Windows Security may "object."
- During setup you will be prompted for an installation folder. Avoid c:\program files\GoldSMS or c:\program files(x86)\GoldSMS. Also avoid installing at the root of a drive, i.e. c:\goldsms. These folders are typically heavily guarded by Microsoft Windows security, and could lead to challenges in their execution. Instead use c:\apps\goldsms or k:\apps\goldsms, etc. or something similar.
Configure Outbound Texting
- Open GoldMine. Our configuration tools needs GoldMine to be open during configuration.
- In your GoldSMS installation folder, run goldsmsconfig.exe. The configuration window looks like this:
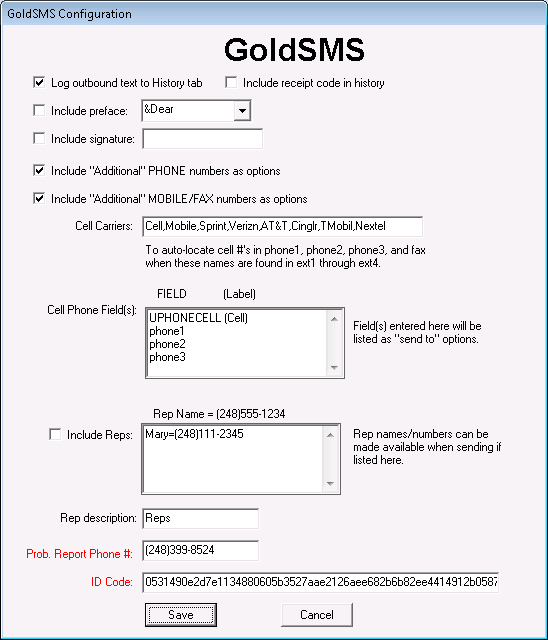
- While the various configuration values will be covered in greater detail in the full User Guide, we want to review a few of these fields right now.
- Prob. Report Phone #. This is normally your company's main switchboard number. If you text someone and they don't recognize who it's from, they may dial that number. When they do, they'll be told to call your Prob. Report Phone # for more info. The "bounce" message could be our "stock" message, which is part voice, part text-to-speech or, for a nominal fee, you could upload your own customized bounce message, up to one minute long, in .mp3 format.
- ID Code. You should have received this code in your GoldSMS welcome email. If you can't find it, give us a call, and we'll re-send it to you.
- Cell Phone Fields. These are the phone fields GoldSMS will offer to you on a drop-down menu when you run it. When starting the goldsmsconfig.exe module, we scanned your current GoldMine fields for words like "cell" or "mobile" appearing in your labels or field names. Your results may differ. If the configurator doesn't find any fields it thinks might be a cell phone field, you may find that this box is blank. You can also list any other field in which you've stored cell phone numbers here.
While not required to have any field(s) listed here, if you want to, you can add fields or delete them just by manually editing this list. For example, you could simply type in PHONE3 if that's where you know most of your contacts' cell phone numbers are.
- Click Save.
Configure GoldMine Taskbar
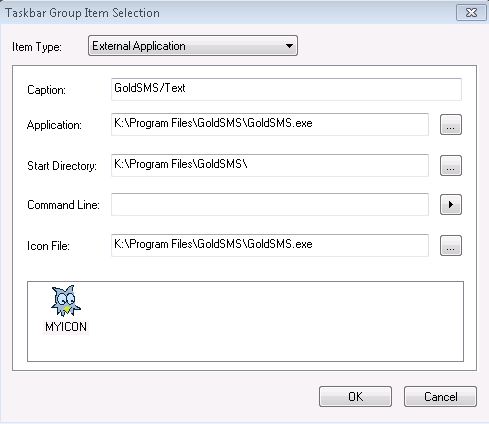
- In GoldMine, you will now configure a shortcut to launch GoldSMS from the Taskbar. This is how you'll launch GoldSMS from within GoldMine. In the top part of your GoldMine screen, right-click and choose Customize Taskbar.
- Right-click in the Taskbar segment of your choice, and choose New Item. You should see the window shown below.
- For the Item Type choose External Application.
- For the caption you can type in whatever you want... this will be what users see when they go to run GoldSMS.
- For the other fields, we suggest you use the search button (with the 3 dots) to locate the files needed, as shown below. Notice that you will be navigating to the file and folder you created in the previous section above.
Register your ID Code
- The first time you run GoldSMS you'll be prompted for your ID Code, if you forgot to enter it into the configuration tool. Just paste it into the prompt and click OK.
That's it! Welcome to GoldSMS!
Questions: Check out our FAQ.
How does GoldSMS decide which number to use to send the text to?
- If one of the main phone extensions (ext1, ext2, ext4, ext3) contains the word "Cell" or "Mobile" or any of the common carrier codes (e.g. Sprint, Verizn, etc.) GoldSMS will pick up that field's related phone number as a possible cell phone number to offer you.
- GoldSMS will also offer, as options, the contents of the fields listed in the PhoneFields settings as described above.
- GoldSMS will also offer, as options, the phone and/or mobile numbers of the related Additional Contacts, if you have chosen to include them during configuration.
- The user may, optionally, type in any valid cell phone number "on the fly" prior to clicking Send.
Configure Inbound Texting
The GoldSMS Inbound Text Retrieval Engine (ITRE) uses a "pull" process to check a cloud-hosted database for new text messages sent to your number. So, the program's name, you'll find, is GoldSMSPull.exe, and the corresponding configuration tool is called GoldSMSPullConfig.exe. Before running the goldsmspullconfig tool, you will need to have received the appropriate provisioning information, including server address, user name, password, and database name. It is somewhat important that the ITRE runs on only one machine at a time on your network, to avoid contention issues.
- Run GoldMine. Our configuration tool needs GoldMine to be open during configuration.
- Create a User account in GoldMine called GOLDSMS. (Or you could use some other account, if you'd like). This is for inbound text messages where the user cannot be automatically assigned.
- Run GoldSMSPullConfig.exe. The program will check to see whether you have a MySQL ODBC driver installed on your computer. If you don't it will offer to initiate that process for you. It will link you to an installation file that you can download to your computer and install. It is normally a very simple and fast operation, and all you need to do is click through all the defaults. Upon successful installation of the MySQL ODBC driver, re-run GoldSMSPullConfig.exe.
You will see a window like this:

- In the first field, GOLDSMS is the name of an "artificial" GoldMine user to whom inbound text messages will be assigned if we can't figure out who the rightful owner should be. This will work even if you don't create a GoldMine user account, but it's probably a good idea to do so.
- In the "Inbound SMS Text Server" area, fill in all the fields with the information you were provided, and click the Test Connection button. The system will either respond that your connection was successful, or it will give you an error message. The error messages indicate one of three things: 1. No MySQL driver, 2. Bad connection details (address, username, password, etc.), or 3. Other unknown problems. If you are having trouble getting this to work, contact your provider, or Plain English CRM Solutions.
- C1 and C2 Match Fields. The ITRE must have some information regarding which field it should use to match the inbound text to a contact record. Examples of a C1 field might be PHONE2, PHONE3, KEY5, etc. Examples of a C2 field might be UPHONECELL, UCELL, etc. If you want to include more than one field, just use a comma to seperate them, i.e. UPHONECELL,UCELLSPOUS,UCELL.
- Inbound text messages are placed on the contacts' Pending tab. "Alarm on inbound text" sets a GoldMine alarm, so that the user can be notified of an inbound text message.
- Record Type permits you to designate the GoldMine activity type that the text message will be classified as. "Other Action" is the default, but you're welcome to change that if you wish.
- The GoldMine Login area allows you to have the GoldSMS ITRE automatically launch GoldMine as a system-tray process if GoldMine is found to be not running. In addition to the path for the GoldMine executable, you'll need to enter a GoldMine user name and password, the database "aliases" for your GoldMine database, and check the Auto-start checkbox. You can see your database aliases from within GoldMine by clicking Help | About GoldMine | System.
When you click Test, this will check to see if a connection to GoldMine can be made. If GoldMine is already running, that is all that will be tested. If you want to use (and test) the Auto-start feature, close GoldMine, and then click Test.
- When finished, click OK to save your settings.
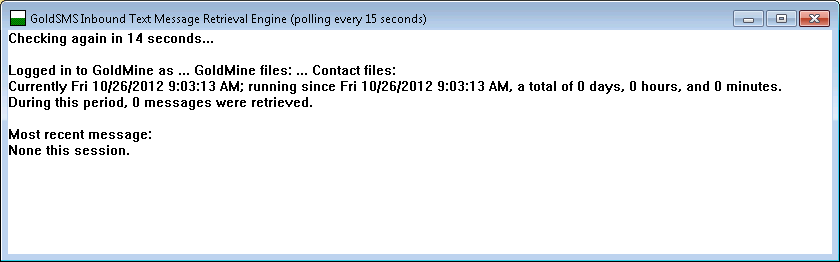
- Start the GoldSMS ITRE by running goldsmspull.exe. No inbound text messages can be retrieved unless the ITRE is running! Again, it is important that the ITRE be running on only one computer on your network.
- When the ITRE first fires up it will look something like this:
- Once it completes its first retrieval cycle, the "Logged in to" line will be refreshed as follows:

- A future version of GoldSMS will allow the ITRE to run as a Windows service but, for now, it can run only as a program. You may minimize it to your task bar if you wish.
 Email this page
- 1987 reads